Customization
SmugMug Spotlight: Andy Yeung.
SmugMug Spotlight: Andy Yeung.
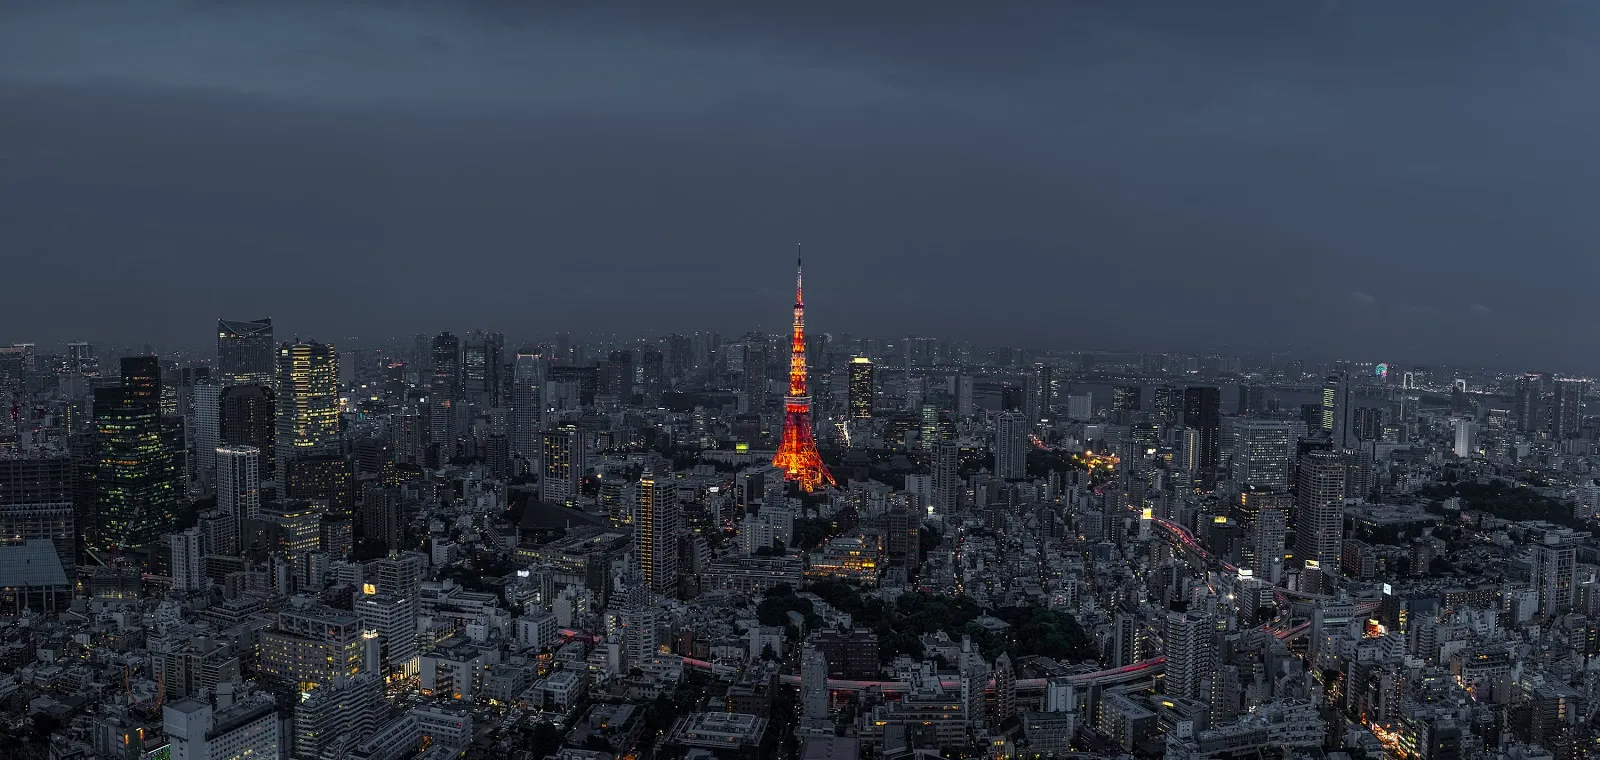
In this SmugMug Spotlight, we had the privilege to meet aerial and landscape photographer Andy Yeung. Based in Hong Kong, Andy has been taking spectacular photographs since 2005. You may even recognize some of his photos — his series called “Urban Jungle” went viral on social media a few years ago.
SmugMug: We are so excited to sit down and talk with you, Andy. Your work is stunning. Can you tell our readers a little more about what got you started in photography?
Andy Yeung: I developed a passion for photography at an early age when I received my father’s old camera as a hand-me-down. It was this early exposure that introduced me to the world of photography, which I believe has a healing power. I believe that a great photograph can speak to people’s emotions and make people pause and think.

SM: You definitely do give us all such a unique perspective of the city! Can you tell our readers more about the gear that you currently use to capture these images?
AY: I use a Canon 5D Mark IV. It is a full-frame camera and has excellent image quality and multiple lens choices. That makes this camera really convenient for me. I also use a DJI drone. This drone provides me a new perspective of where I’m at and is very reliable and stable to fly.

SM: Awesome. Tell us more about why you chose to shoot your genre of photography.
AY: I photograph cityscapes and architecture — mostly capturing the unique visual and structural characteristics of Hong Kong from the perspective of a local photographer. I got into drone flying in 2015 and that has added the new perspective that I was looking for.

SM: Your aerial shots definitely show a unique perspective of Hong Kong that you wouldn’t get if you were just walking the streets. Why did you choose SmugMug to be your partner in presenting and preserving these amazing shots?
AY: I’ve been using SmugMug since 2014, if my memory serves me right. I started using SmugMug because it is very user-friendly and a great platform for photographers to promote themselves and offer prints for purchase. Plus, many well-known photographers are using it.

SM: Wonderful! We are so glad that you’re happy with the platform. One last question: Do you have any advice or tips for a new SmugMug user?
AY: I highly recommend customizing your website template! Spending the time to do that will help you stand out even more.
SM: Thank you, Andy! Great advice and again, thank you for your time and allowing us (and our readers!) to get to know you better.

_______
About Andy Yeung: Andy Yeung is an award-winning photographer specializing in architecture and landscape photography. As a born-and-raised Hong Konger, he learned to cull inspiration from the familiar, especially when it comes to coming up with shots of his over-photographed city. He relies on a good eye and knowledge of techniques to capture magical moments of Hong Kong and transform what he has seen into something that mirrors how he feels.

SmugMug Spotlight: Richard Burley.
SmugMug Spotlight: Richard Burley.
Richard Burley is an educator, photographer, and the founder of Epic Action Imagery. He travels the world photographing sporting events from football and hockey to obstacle races like Tough Mudder and Spartan. We caught a moment of his time to talk about luck, sofas, and velociraptors, among other fun details.

SmugMug: Hi Richard. To start with, tell us about yourself!
Richard Burley: I’m a sports and action photographer based in the UK. Prior to taking up photography as my full-time job, I worked in education. Initially as a college teacher progressing up the career ladder to management roles. In 2014, just as my photo business was starting to grow, a conversation about volunteers for redundancy saw my hand shoot up. A few weeks later I packed up my desk and headed out of my office and on to what became a huge adventure. I do still teach a few hours and enjoy that side of my life too, but I fell in love with action photography early.
SM: How’d you get into photography?
RB: I’ve had an interest in photography since I was a child watching my dad in his home darkroom developing photos. It wasn’t until much later that I started to think more seriously about taking photos professionally, but my interest in capturing sport, action, and movement was growing.
I bought my first DSLR with the royalties from a text book I co-authored and started to learn lessons by trial and error. I prefer to learn by experimenting and finding out what works and what doesn’t rather than reading or watching others. The only qualification I’ve actually got is a badge from Cub Scouts. I’m very much self-taught.

SM: Tell us about starting and growing a photography company?
RB: The real start of it was in January of 2010. I’d stopped coaching football and decided I wanted to get into photography, and was shooting semi-pro matches for a friend. But I just wasn’t getting the shots I wanted, because I was convinced I didn’t have the right lens.
So I go to the camera shop, just to look at a new 70–200mm lens…and 30 seconds later I’m walking out with the box. [laughs] And I’m thinking “I’ve just spent the sofa deposit on a new camera lens, this is gonna take some explaining.”
So I told my wife I spent the money we’d saved for a sofa on a camera lens, and she responded “Well you’re gonna have to take that lens and make that money again.” Which I took very literally! I said okay, I’ll start a business.
SM: The right equipment can make all the difference! What happened next?
RB: A couple of months later, I’m shooting the occasional sporting event, making a little bit of money, but still employed full-time with the college, when on a trip to Cambridge with the family I spot a billboard. On this billboard is a picture of someone jumping over burning straw bales, and I thought “that looks like fun, why don’t I see if they’ve got a photographer?”
There’s a concept people in business will often refer to called “luck.” I think I’ve benefited from an enormous amount of luck. This was a billboard for Spartan Race. They’d just started — one event in the US, no events anywhere else, this was their first event in the UK — and they said “you know, we hadn’t thought about course photography, of course you can come!”
That first moment at a Spartan Race really told me what it was gonna be like: I’m set up along the course, waiting for people to come from the right, and suddenly they appear to my left like velociraptors. And that was it. That said to me “don’t ever expect everything. You know that thing where you like things to be predictable? You’re gonna have to part with that.”

SM: What a lesson to learn on the first day. How’d you grow that into the Epic Action Imagery we see today?
RB: Well, one thing led to another and soon Spartan was asking me to shoot their international events. Then other events start asking me to shoot, because they’re pulling from Spartan’s pool of course photographers, and suddenly I’m doing this full time and building teams. I’d call it an accidental business, really. An experiment that got entirely out of hand.
I think I was fairly lucky, again, because I was an educator and a manager in my full-time work before this. I was used to recruitment, I was used to building teams, passing on information, delegating, and allowing people to grow. Everything I did was very developmental.
The whole purpose of education is to help people grow to become better than yourself — and not be intimidated by that, which is a great fit for photography. It’s really something I look for while building a team of photographers: work that makes me stop and go “whoa. I’ve gotta know how you got that.” I’ve had the privilege of working with other photographers that inspire and enthuse me to work hard and to keep learning.

SM: What is it about action photography that calls to you?
RB: I enjoy the challenge of capturing movement at the right time. Facial expressions in sport really tell a story too. Emotions are often amplified in a sporting environment and seeking to tell the story is a challenge that I enjoy. Participants on a Tough Mudder course emerging from ice filled pools or getting zapped by electricity really brings out a range of expressions. And I’ve done a couple of the events myself so I have an inkling of what they’re experiencing.
I enjoy the people too. Sports events have an energy and a vibe that I find motivating. Capturing people overcoming fears or beating their personal bests is a responsibility I take seriously and I work hard to ensure that moment is captured for them to share with their friends and family. There’s been several moments where I’ve captured people who’ve overcome significant changes in their life to achieve a sporting goal. Often I find there’s a bit of dust in my eye when seeing such a victory.
A big motivation for me to make amateur sports people look like pros, giving them an image in which they look truly epic. From my personal perspective I always try to take a picture that makes a person look and feel like Usain Bolt. When they’ve had a bad day and they’re reaching for that beer in the fridge, they can see a picture on the fridge door of themselves leaping over flaming hay bales and think “I am awesome! I am epic!”
SM: Last business question: what’s the biggest challenge in shooting action photography?
RB: The vagaries of the weather, absolutely. I’ve worked in 42 degree heat (108° F) in Bahrain, and I’ve worked in -20 cold (-4° F) in Canada. Thigh-deep snow, I’ve been swatting flies off, days where it feels like someone’s hitting me with a firehose, but I love that. I love being outdoors. To reframe that: I don’t think there’s a challenge apart from loving what you do, really.
Even when you’re shooting the same thing — someone jumping over flames or crawling through mud — how do you tap into the journey they took to get there, to be fit enough to run five miles and leap over these flames? The biggest challenge, and the biggest joy, really, is tapping into the energy and euphoria of these participants each and every time.

SM: What gear do you use to capture those moments?
RB: Canon 1DXs (3 x mk1 and 1 x mk2) with a range of lenses from 16mm to 400mm. I started with Canon in 2006 and have yet to be tempted to try anything else. I am curious to try a few mirrorless options and listen to the experiences of other photographers when considering my kit choices, but the 1DX is a versatile workhorse and has coped very well with the range of conditions that I find myself working in and the image quality means that I can get the images I want.
The lenses I favor for events are the 16–35mm and the 70–200mm. My kit gets a fair amount of scuffing on rocks and hard ground so I use an EasyCover to try to keep my kit protected.
For football, I’ll have the 400mm and 70–200mm as a main set up and the 16mm on a remote camera positioned behind the goal using a PocketWizard set up. The 400mm is my favourite lens. It’s an old-school mark 1 IS 2.8, but so crisp and ideal for capturing the action that unfolds at the other end of the pitch. It’s a little heavy and if the teams change ends before kick off, it’s quite a challenge to run round the pitch perimeter with all the gear. I hear the mkIII may be a little more mobile and I may make the switch in the future.
SM: Speaking of gear, what got you started with SmugMug?
RB: I started with SmugMug in 2013. I met a representative at the PhotoShow and at the time was looking for a platform to host event images in a cost-effective, reliable, high quality, and simple to use manner. I was also in search of something that would let me search my photos by keywords and bib numbers so I could easily sort participant photos. We had to be able to deal with the kind of peak demand that these events generate. Fortunately, SmugMug met all these criteria and I signed up that evening. 4.7 million photos later we’re still going — if I posted one photo every minute, it would take me 7 ½ years to get through them all. We love it.

SM: What’s your most-used or favorite SmugMug feature?
RB: I actually just redesigned the site last week. Part of our post-COVID recovery has been taking the time to think about what we do and why we do it, and engaging with my local business community. I met with a local marketer who told me “your photos are amazing, but man your website’s old fashioned.”
So I tried a landing page, liked the look, and three hours later I’ve got the whole site looking brand new. It was that easy.
In terms of what I use a lot, it’s image library management. SmugMug works as part of our client relationships, so Spartan or whoever can go in and retrieve images easily, and we manage their photo library as part of the business relationship. They tell us what details they want for the photo — keywords, metadata, factoids, you name it — and we’ll get those set up for them.
Photo sharing is a big part of it, too, and obviously sales, which we like because they’re all seamless. It’s also visibility. I can see what photos people are buying, track stats, keep up with what’s popular. Sometimes you get excited about an image as a photographer because all of the elements came together, and you get to see people excited about those same things enough to buy and share them, too.
SM: Lastly, any tips for a new SmugMug user?
RB: Learn. Keep learning. See what others do, interrogate the style, and let that style influence you as you capture your images and organize your site. There’s so many wonderfully talented photographers showcasing their work on SmugMug, it’s a great way to find inspiration and to showcase your own work.

_______
Follow Richard Burley on Instagram and Facebook. Also, visit his website at https://www.epicactionimagery.com.
And, tell us what you think of this interview! Start a conversation on SmugMug’s Twitter, Instagram, and Facebook.

SmugMug Spotlight: Erika Seress.
SmugMug Spotlight: Erika Seress.
A newborn baby is one of life’s most precious additions and the source of many joyful moments. But how to capture those moments, fleeting as they are? Enter LA-based photographer Erika Seress, founder of The Pod Photography, a modern portrait studio specializing in helping make parents and their little ones look their very best. We sat down with Erika to talk to her about the work she does, why she does it, and what advice she can offer anyone new to SmugMug.
SmugMug: Hi Erika, thanks so much for chatting with us! Your work shows off such wonderful passion. Please, tell our readers more about you.
Erika Seress: Hi! So nice to chat with you today, and thank you! I’m Erika Seress, and I founded The Pod Photography in 2008. I had a vision of creating a modern portrait studio for today’s sophisticated clientele, and I love photographing people—especially tiny ones! I specialize in documenting baby’s first-year milestones. I’ve also authored The Parent’s Pocket Guide: Taking Kids’ and Family Photos, am a photography workshop teacher, and appeared on Lifetime, Hollywood Access Live, and various celebrity reality shows. I’ve also been published in Cosmopolitan magazine and The Wall Street Journal.
SM: That’s incredible! You’re one busy and successful photographer. Our readers always love to hear this part, so please tell us how you got started in photography.
ES: I started taking pictures to document my travels while living abroad in Thailand and Germany. I loved capturing the culture, people, and my daily life so I could look back on them. When I moved home to Los Angeles, I got a degree in photography on top of my business degree and then started my portrait studio in 2008.
SM: Amazing. Thailand and Germany are two incredibly stunning areas of the world. Another insight that our readers like to know is what equipment do you use and why?
ES: I am a Nikon shooter. I love how intuitive the gear is as well as the sharpness of their lenses. I shoot 90% of my photography with a Nikon 70–200mm f/2.8 lens since it is perfect for really flattering portraits of people, plus I can zoom in and out to take both full lengths and close-ups of a child without moving my body. You've got to be quick when it comes to kids!
SM: It’s so true! They definitely change and move in a blink of an eye, but It sounds like you enjoy the challenge and have mastered it. Your photos definitely reflect how good you are at capturing that moment. Could you tell us more about the type of photography you shoot and why?
ES: Sure! As mentioned, I am a portrait photographer specializing in newborn, maternity, babies, kids, and family photos. I have always loved photographing people, and at the beginning of my career I did mainly fashion and commercial work. I came to realize that I felt much more fulfilled by working with private clients and creating art for their families, so I have shifted my business toward that focus.
Today, my company, The Pod Photography, has really flourished in Los Angeles where we focus on a mix of modern natural-light portraiture and elaborate set design. I love the art of creating custom sets that reflect a family’s or child's hobbies or personality or just bring some whimsy to the portraits. I was recently commissioned to create intricate sets recreating a Starbucks store, the Oval Office, Star Wars, as well as design elegant tea-party sets for my newborn and first-birthday clients. We have a lot of fun at my studio!
SM: What brought you to using SmugMug for your photos?
ES: I've been using SmugMug since I created my very first website in 2008. I love SmugMug because of its integration with sales, and how I can seamlessly sell digital and printed products through my website. I'm also a big fan of the unlimited storage!
SM: That’s awesome! OK, one last question: Do you have any advice for someone who’s just starting to use SmugMug themselves?
ES: Get creative designing your website! Start with a template but don't be afraid to customize it so your website stands out from the rest. SmugMug makes it so easy to have a unique website.
SM: What a wonderful tip! Thanks so much for sitting down with us today and for sharing your story with our readers—we really appreciate it!
_______
For more about Erika Seress of The Pod Photography, visit her website at https://www.thepodphoto.com/ or follow her on Facebook and Instagram.

Custom photo pages, no code required.
Custom photo pages, no code required.
Need to make a custom page with text and photo features? On SmugMug, it's as easy as drag, drop, and go. Here's how to build a custom page in three easy steps.
Step 1: Create it.
First, create the page you want. If you want to create an About Me page, for example, start by hitting the Organize link in your site header, then click Create > Web Page.
Give it a name, keywords, settings, and any other information you’d like to add. Hit the Done button at the top of your browser window to save.
Tip: Your new page will appear at the bottom of your folder tree list when you open your site Organizer. You can drag it to any other place (like into a folder) if you want to move it.
Step 2: Customize it.
Next, find the page you just made. You can do this by typing in the URL for it, or you can click the link from the preview window in your site Organizer.
Once you're at your new page, open up customization by clicking Customize Design at the top of your page. To make sure you'll be applying changes to only the new page (and not your whole site), look for the following folder list at the top right.
Browse through the different content boxes available in the Content tab and drag the ones you like wherever you want onto your page.
Tip: A light green line will appear in any spot that can accept a block. If you miss, we'll show you a dotted outline mapping out where valid areas lie on the page. Experiment and have fun!
Step 3: Link it.
You always get an instant, live preview of changes as you’re making them, but to clear the windows, click the Preview button and then Done when you're finished.
Copy the URL for your new page from the top of your browser, then in the Customizer, click to highlight the top-level, Entire Site option from the top right.
If the site design you've chosen comes with a menu bar, click the little wrench to open the edit box.
Tip: If your design doesn't include a menu bar, you can add one by dragging and dropping the Menu content block from the Content > Navigation section.
Click the "+" sign to add a link to the menu. Fill in the copy you want and paste in the URL for the new page you created. Click Done.
That's it! Your new page is ready to be seen.

Create a great experience on your photography site.
Create a great experience on your photography site.
A happy customer is a return customer. Your clients chose you over others because they knew you could meet their specific needs, but your job is much more than creating a few good photos: you need to deliver a quality experience from first contact to getting those prints into their hands.
Make a great first impression.
All websites have some basic, common elements: a landing page, header, footer, content boxes, and a way to navigate from page to page. You can change all these elements using customization on your SmugMug Power, Portfolio, and Pro sites.
In addition to the above, you should include the following:
- Your logo
- Contact information (a must!)
- Navigation
- Homepage description and meta keywords
You can also spice your website up with
- A slideshow or video
- Your most recent uploads
- A search box
- or any of the many different content blocks available on your SmugMug homepage.
Don't hide your email address.
Make use of your built-in SmugMug profile. Add your name or business name, an image of yourself, and a background image to take full advantage. You want this info to be easy to find, either on your homepage or in an “About Me” page.
All SmugMug accounts also get a contact email address to fill in on their profile. That, in turn, creates a contact request form available from the contact link in the footer or in your navigation menu.
Keep your site organized.
While galleries are the building blocks of your site, they can be categorized into higher-level folders up to seven levels deep. Keep your site organized to make things easier on your visitors. Then build a navigation menu to help them get around your site.
A navigation menu is a row of links at the top or side of every page, best used when you link to specific galleries, pages, or folders on your site. For extra assistance navigating your site, consider adding breadcrumbs. These additional links at the top of each gallery easily take your viewers back to a gallery’s category or to your homepage. Nothing's worse than a digital dead-end.
Prevent analysis paralysis.
Limit choices and don’t overwhelm the viewer. Cull your shoot down to the best of the best. Limit the products that you sell as well—price only those that best suit your photos' and your clients' needs.
Then organize your photos to provide a great customer experience in a meaningful and easy-to-navigate way. Your viewer will have an easier time browsing their wedding photos if you take the time to organize them into galleries rather than showing them one gallery with all 1,200 photos.
SmugMug smart galleries can be a real timesaver. Create your galleries and define rules based on keywords, then upload all your photos into a single Unlisted gallery. The smart gallery settings will automatically pull in photos that match your rules based on your keywords.
Take this one step further by making use of events and favorites so customers can pick and choose their favorite photos. Favorites are put into a separate gallery that both you and your customer can see, providing a great way to discuss their choices.
Create a sense of urgency.
Giving clients incentive to buy sooner than later can make all the difference. Try these tips:
- Create limited-time discounts immediately after the event. With SmugMug, you can easily create a coupon good for only a few days to get clients buying while their memories are fresh.
- Try seasonal or special-event discounts. Encourage customers to avoid the Christmas rush by having a special deal available only in September.
- Take galleries offline (make them unlisted or change the password) after a certain date. Just make sure potential customers know this deadline so they know exactly how long they have to browse and purchase.
Creating an easy and user-friendly site will encourage customers to linger on your site: clear, organized navigation, easy-to-find galleries, and a simple list of products they can buy are all incredibly helpful. Try these tips to keep your bounce rate down and your sale rate up.

Photographers: Guide your guests to the gold.
Photographers: Guide your guests to the gold.
As your photo library grows and grows, so does the challenge of keeping track of your memories or your clients' shoots. It's crucial to keep your site neat, and it's exceptionally easy to manage all your folders and galleries with the powerful Organizer tool.
But beyond that, the content you display on your pages is the most important part of your viewers' experience. Think about what a guest or a potential client is looking for when they see your website for the first time. Will they find what they need or will they give up and move on?
How do you go about guiding them to the right stuff?
There are several really great ways to guide visitors that arrive on your homepage to the content that you want them to see most. We've gathered a few of the best examples from SmugMug photographers.
Homepage content blocks.
Choose exactly what to display on your homepage using our drag-and-drop content blocks. You can add any of the following:
- Single image blocks that click through to a favorite gallery.
- Folder, gallery, or page blocks that lead your visitors right to the work you want them to see.
- Video from your SmugMug site, YouTube, or Vimeo.
- A feed from your blog.
These can be used as a “call to action” to move a visitor from your homepage and into a specific selection of pages on your site.
Here are a couple of elegant examples of content blocks on the homepage:
Keyword cloud.
Take advantage of the keywords you've added to your photos to help visitors find the right stuff. You'll find the keyword cloud content block among the discovery choices in the customize content block panel.
Navigation menu.
A well-constructed menu bar allows you to bring attention to the galleries you want to be seen first, and to link to other places around your site: your portfolio, your “About Me” page, your pricing, your contact information, and so on.
The SmugMug default navigation menu includes links to Home, Browse, and Search, but we recommend you add more so your guests don't have to slog through all your galleries to find examples of your work.
Look here to see how to add new links to your menu bar.
Mix and match.
Why choose? The best (and clearest!) way to guide your guests is to use both a well-curated homepage and a well-manicured menu bar.
Here's what we suggest:
- Use the menu bar to link to an About page, how to contact you, and what services you offer.
- Use content blocks to show your fans specific galleries that demonstrate what you do best.
Getting your visitors and potential clients quickly to your best and most relevant content is an ideal way to increase engagement and potentially land that new sale. Have any other tips that you’ve found helpful? Share them with us.

5 frustration-free ways to reboot your photo website.
5 frustration-free ways to reboot your photo website.
The beginning of the year can be a slow time for photo-taking, but it’s a great time to work on everything else you do with photography: update your portfolio, create or clean up your photo website, set new business goals, or even write down a new bucket list of shots to take.
We all change with time, so whether it’s been two years or five since your website has seen a makeover, you’ll want to present the truest version of yourself to your fans.
Here are a few tips to get your online self ready, without frustration.
Breathe new life into your existing site.
There’s no better way to feel “new” than to make changes to the site you already have. Thankfully, SmugMug makes this easy. Tip: If you’re short on time, pick just one or two of the following steps; but tackle all five for maximum results.
1. Kill your darlings.
We’ve heard 24 images is the ideal number of photos for your portfolio. If you’ve been taking photos for a while, you probably have more favorites than this for sentimental reasons. Now’s a great time to trim that back. Creatives call this "killing your darlings."
- Be critical. Be sure your short list features only your most powerful work.
- Stay on topic. If you’re looking to book sports events, get rid of the landscapes in your portfolio. Or create a separate portfolio gallery for each type of work so you can link your clients directly to the most relevant one.
- Enlist your fellow photo friends. Removing your own emotion about your photos is extremely difficult, but friends with good taste can help you pick the gems best suited for your portfolio. Ask them to choose the photos they think tell the best story.
2. Reorganize what you have.
Think like a fan who stumbles onto your site: What interests you?
- Reorganize the photos on your site using the Organizer on SmugMug. Drag old photos from your portfolio gallery to your archives, and drag your new favorites into your portfolio. If you’d rather not shuffle photos, use the collect tool to place a virtual copy of the original into your portfolio gallery.
- Want to make big changes? The Organizer will also let you move, collect, and delete images, galleries, and folders all in one go. Or simply change the privacy settings on your pages, galleries, and folders to hide your older content without actually removing it from your site.
Dozens of beautiful layouts come free with every SmugMug site.
3. Paint the front door.
Changing your theme, site design, or homepage gives you the biggest bang for your buck. (Especially since it all comes free with your existing SmugMug subscription.)
- Your SmugMug membership includes dozens of beautiful designs that instantly change the look and feel of your site. Change a little or a lot, and your original design stays the same until you’re ready to share it with the world.
- If you’ve reorganized your content like we recommended above, don’t forget to update your navigation bars and your homepage layout to direct people to the new stuff.
4. Ask, “Can my site be found?”
Do an SEO audit. Whether you need your friends to find your site, want to attract new clients, or simply want to be Internet famous, your website and photos need to be found by search engines like Google.
- Update your meta descriptions, meta keywords, custom URLs, and photo keywords. Make sure they’re specific and relevant to your photography, location, business, and more.
Poor example: "wedding photos"
Good example: "Salt Lake City analog medium format wedding photography and portraiture by Hass L. Blad"
- Double-check your privacy settings in your account settings and on your public galleries and pages, like your portfolio. Remember: Private and Unlisted galleries can’t be seen by search engines.
5. Pros: Look at your business plan.
Is your goal this year to break the bank in sales?
- Update your pricelists. Inflation, cost-of-living increases, and you getting better at your job are all reasons to keep your prices competitive. If you don’t know how much to charge, we’ve got some basic tips on how to price your work.
- Review (and use) all the Pro business tools available to you from SmugMug.
- Avoid theft! Keep your images protected from unauthorized use.
We hope these tips help you create a website you’ll always love to share. Whether it’s January, June, or any time of the year, your confidence could always use a boost.
Build a custom photo website on SmugMug.
Build a custom photo website on SmugMug.
The layout, design, and overall look and feel of your photo site all play a huge role in the first impression you make on visitors. That’s why we give you complete control over how your site is designed on SmugMug.
Note: Not all features mentioned below may be available on all account types. Check our account comparison chart if you’re unsure about which features are available to you.
If you’re a pro photographer or anyone else who takes photos for a business, customization is also the most powerful way to bring your brand to the forefront and give a clean, organized, put-together appearance. Nothing says, “I’d hire that!” more than a clean, beautiful, unified look and feel.
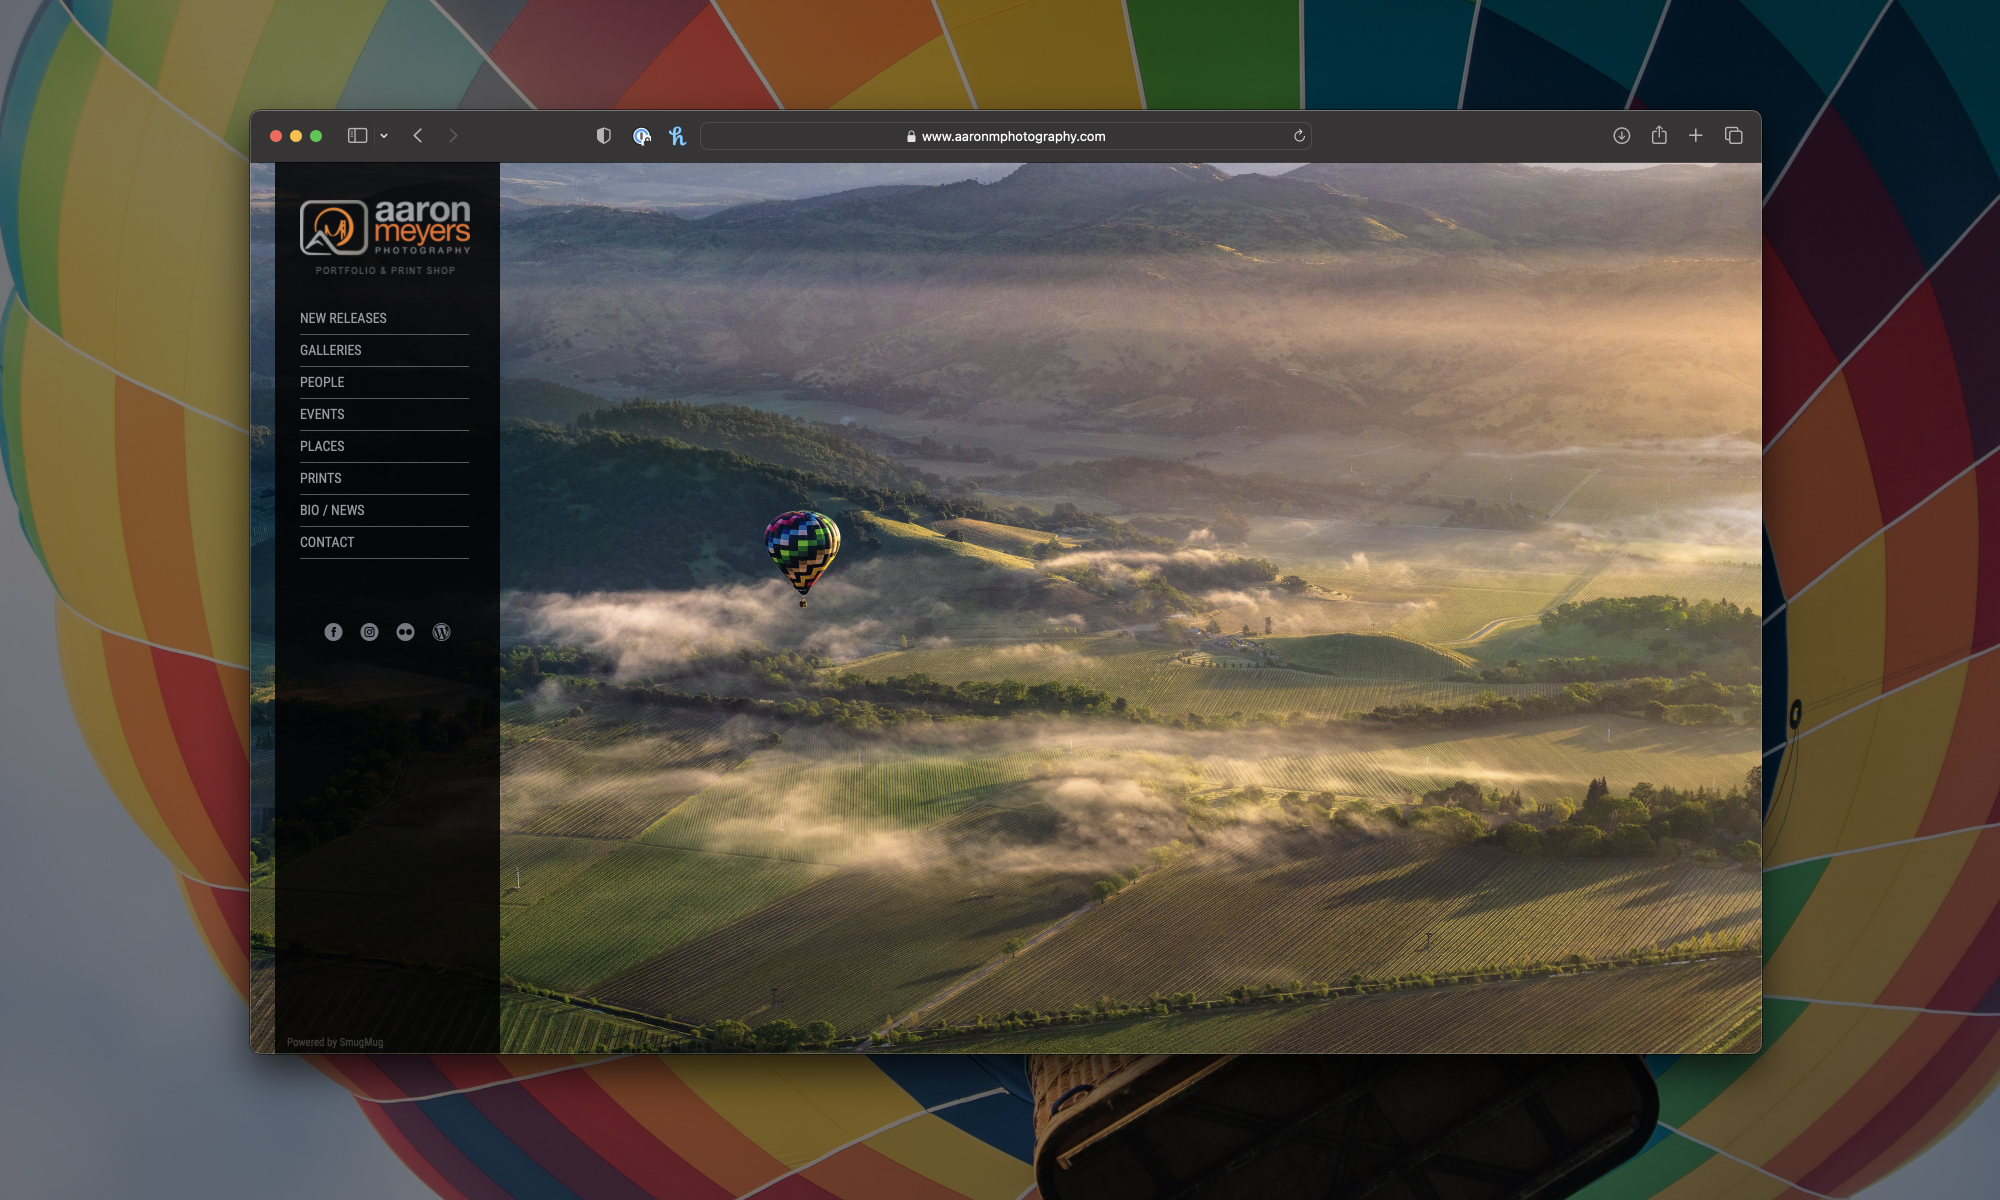
Here are some examples of beautifully beautifully customized SmugMug sites:

How do I customize on SmugMug?
You’ve got a few options ranging from "I don't have time for more than a few clicks" to “I'm all in." But we promise you’ll love the way your site looks no matter how deep you dive.
Contact our Support Heroes if you’ve got additional questions or if you just need a helping hand.
Themes, designs, and content blocks.
These are the building blocks of SmugMug. All SmugMug accounts can choose from dozens of beautiful designs that bring your website to life and suit virtually any mood or palette. Additionally, all SmugMug owners can add, remove, or swap content blocks on the homepage, giving you endless configurations for the first photos, videos, and words your visitors will see.
Power, Portfolio, and Pro accounts have additional options to change the look and feel of the site, including modifying and creating completely custom themes. Changing the overall design gives you different layouts that change the location of essential features like a navigation bar, thumbnails, your cover photo, and your profile photo. The best part is you can create several versions of the same website using different designs, then swap between them.
CSS and HTML.
If you’re not a beginner or want to create more powerful tweaks, you can use your own CSS and HTML to personalize your theme or make changes to specific pages on your site.
To have your code apply across your whole site, look for the Advanced tab under your theme options where you can add your own CSS. To have your code apply to only a single page or gallery, drag and drop an HTML or CSS content block onto any page of your site and add your code there.
Need help? We’ve got cut-and-paste code shared by our in-house customization experts as well as tweaks shared by fellow SmugMug users like you in our Digital Grin customization forum.
Your new SmugMug photo site in 5 minutes or less.
Your new SmugMug photo site in 5 minutes or less.
Short on time? We get it. That's why SmugMug gives you everything you need to publish your site quickly and easily. All you need to know how to do is click a mouse.
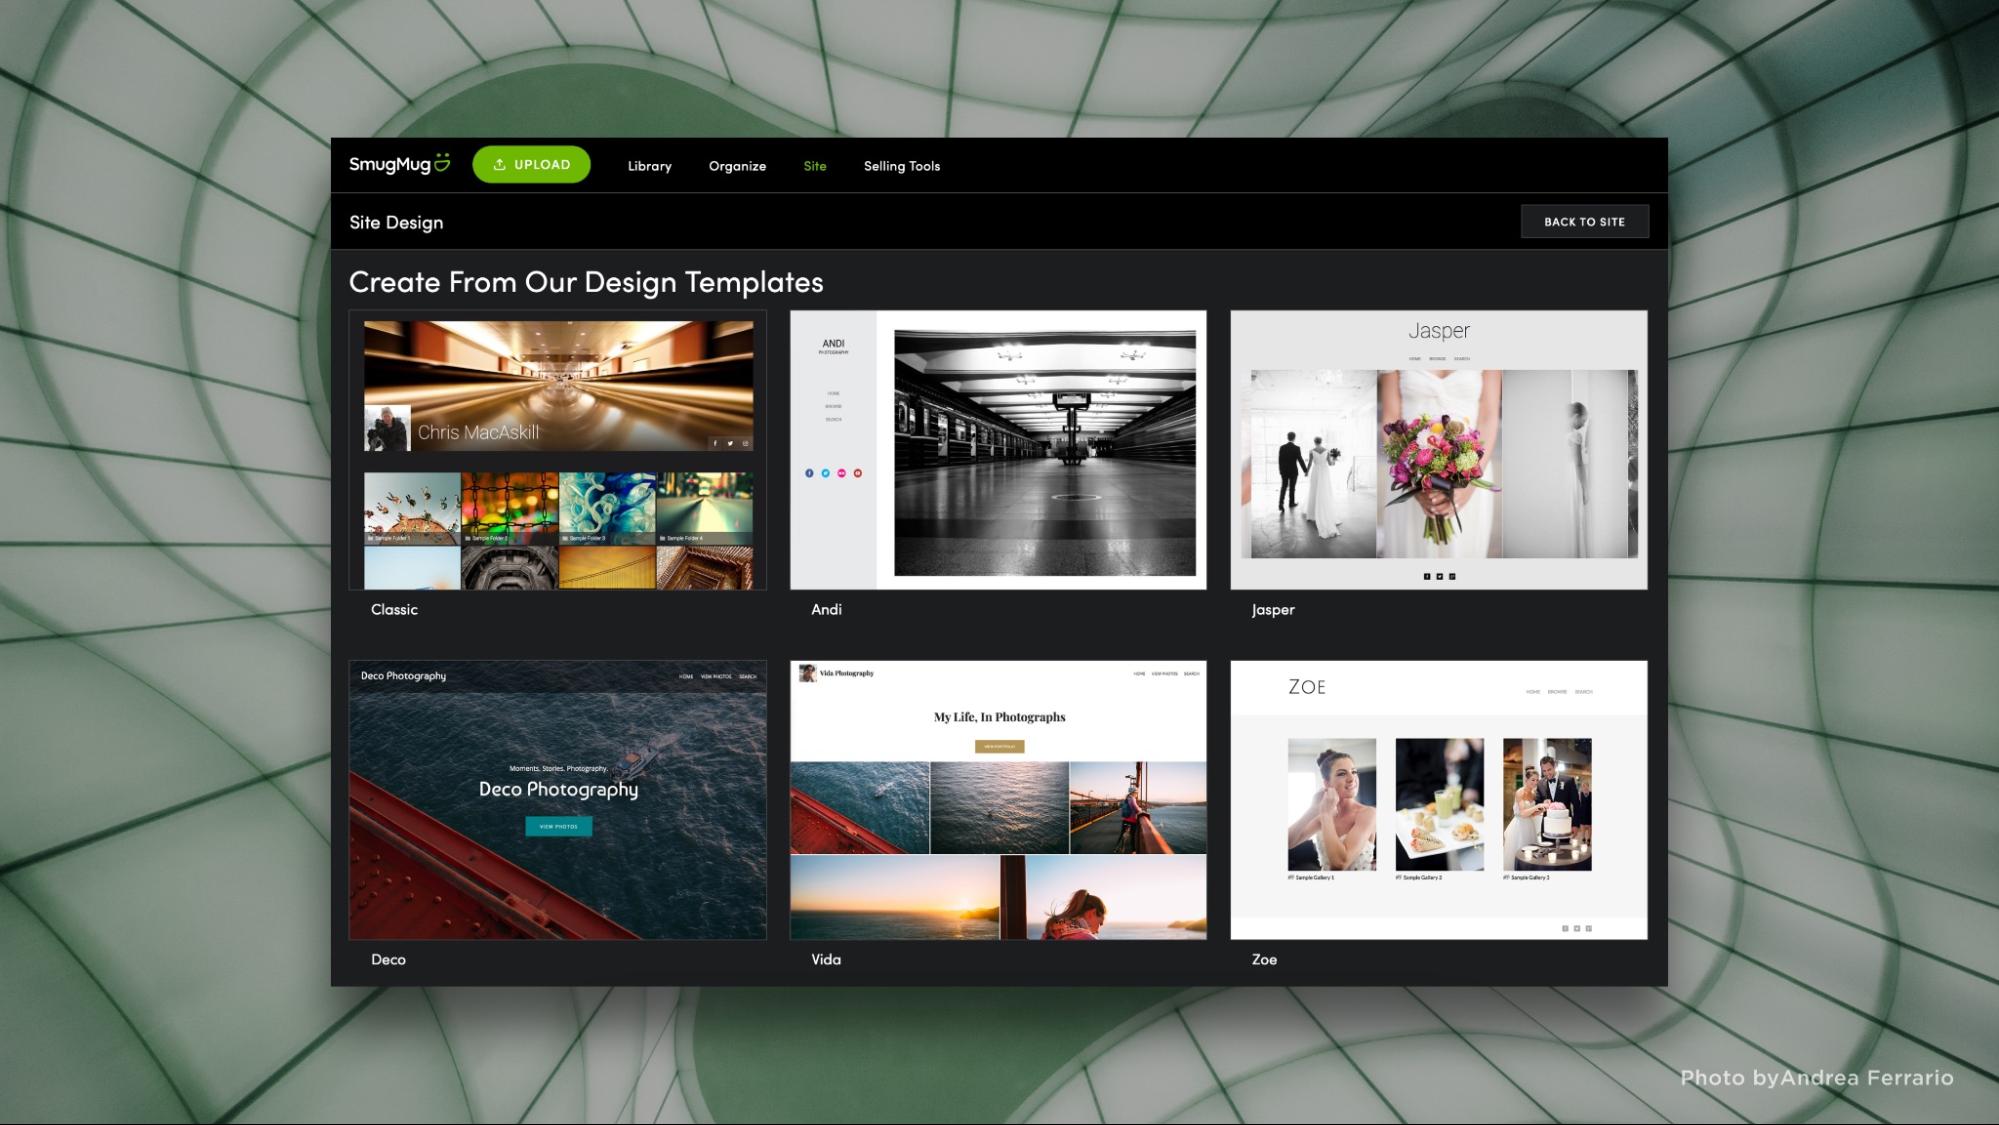
Step 1. Choose a design.
We offer several beautiful site designs for you to choose from, and you can always choose a different template later. Each one comes with an out-of-the-box, designer-approved layout, font choice, and color scheme. We’ve created a variety to fit many styles of photography, so scroll through and pick the one that speaks to you.
Step 2. Add photos.
When you open a new SmugMug account, you'll want to add photos to it right away. There are many ways to upload your photos, from our built-in browser-based uploaders to our publish service for Lightroom users.
FYI: At this point your site is good to go. Simply hit the Show Me My Site button and your new website will be visible to the world! But if you want to make further changes, keep reading.
Step 3. Customize the design.
We make it easy to change the look and feel of elements that appear across all your site's pages. Some examples include adding a background image, including your name in the header, and changing text on your menu bar.
To open customization mode, click Customize Design at the top of your site.
Here are a few things you could tweak first:
- Personalize the header.
Most designs already include a basic navigation bar with a way for your viewers to get back to your homepage, view your site content on a Browse page, and search for a specific photo. You can add more links by editing this content box. - Change the theme.
Designs have their own color schemes, but you can pick individual page colors and fonts if you prefer a different feel. - Adjust the footer.
If you have a Power, Portfolio, or Pro account, you'll see an option to add your name, social buttons, or whatever else you wish to the footer.
Tip: Make sure you’re on the Entire Site customization mode; otherwise, your tweaks won’t show up across your site.
Step 4. Personalize your homepage.
Your design will include various galleries and content on your homepage, but you can edit them (or add more!) by clicking Customize Design and making sure Homepage is selected.
Drag and drop, remove, or edit the individual content blocks that appear on this page. You'll know where they can go when you see a highlighted arrow and green line appear. Note that you can stack content blocks one atop the other, or line them up to create columns across the page.
Tip: The page elements are color coded, so you can edit any level content block from any page. For example, if you click the Customize Design button from within a gallery, you can still tweak sitewide things like the header and footer.
Step 5. Publish!
Once you're happy with the content blocks you've arranged, you can click Preview to see your changes without the customization menus covering the screen.
Love it? Hit Done. Your new site is now available for the world to see. Congratulations!
(Bonus) Step 6. Keep going!
Your design will have the essentials already built in, but with a Power, Portfolio, or Pro account, you can add more pages to suit your style. For example, you can create an “About Me” page with your photo and bio, a “Services” page, etc. Simply click the Organize button at the top of your homepage. Once inside the Organizer menu, choose Create > Web Page and name it.
Next you’ll see your brand-new page. From here, you can customize and add in any content blocks in virtually any configuration you want. When you're happy with it, publish your changes.
If you’d like to make your new page easier to find, open customization mode and mouse over your menu bar. Click to edit it and add a new link, then find the link to your new page within the Pages I Choose picker menu.
Tip: You can drag to rearrange the different links in your preferred order.
And with that, you’re done!
Four steps to improve your SEO on SmugMug.
Four steps to improve your SEO on SmugMug.
Optimizing your photography website for SEO is easy. Whether you’re trying to sell more prints, attract new portrait or events clients, or simply get more eyes on your work, you can do it by following a few simple steps.
Step 1: Add and edit content.
Content is what search engines use to identify what is on your page. Although some search engines like Google use natural language processing to try and understand what each word means, the more specific in text you can be the better.
Your easiest SEO win starts here: go through your website and find headers, page titles, and blocks of body copy, and review them for simplicity and clarity.
Instead of saying “The stunning skies over mountains in Utah’s national parks” in a gallery header, maybe say “Art prints of the mountains and sky in Zion National Park”. Both of these will tell a visitor similar information, but the second version is easier for a search engine to understand, making your page that much more likely to be found.
As you’re reviewing your content, look for opportunities to build internal links. These are the linked words or phrases on most websites that help guide a user to the information they’re looking for. For example, your “Art prints of the mountains and sky in Zion National Park” might add an internal link to “Art prints” that leads to your catalog page, where users can browse the full variety of products you offer.
The keywords you use for these links help your visitors find the pages they’re looking for, and search engines use them to determine what each page is about. But be careful not to link off of the same words to two separate pages. This will cause confusion for search engines and potentially your customers.
Search engines will also look at the amount of links pointing to each page on your website. The more links you assign to a specific page, the more important a search engine will think it is. This gives that page more priority, so make sure your main galleries, signature shots, and business-generating pages are linked to from as many places on your site as possible.
Step 2: Name your images and galleries.
Just like the copy on the page and the internal links, wording matters on your images and galleries. Naming your images includes the actual name of the image, the title tag, alt tag, and the description.
These elements are used both by browser helpers for people with disabilities and search engines to understand what the image is about. A lack of image titles, tags, and descriptions makes it harder for a search engine to understand what the image is, so the search engine will likely choose another photographer’s work to display over your photo.
Your words matter here as well, especially regarding genre and location. If you are selling a print of The Vessel in NYC, name your photo “fine art photo of The Vessel building in NYC”. If you are a sports team photographer, name a photo “Soccer team group photo New Orleans”. Including specificity in your naming and tagging will go a long way toward getting your work found.
The naming and structure of your galleries also contributes to your site’s SEO. Start with the overall theme for the main gallery and then add in niche galleries underneath.
For example, you could create a gallery called Assateague Island Photos that houses all of your favorite shots from this specific place. Inside this gallery you could build sub-galleries like “Assateague Beach Photos”, “Assateague Island Wildlife”, and “Camping Photos on Assateague Island”. Under wildlife you could even build sub-galleries for the island's famous inhabitants like wild horses.
By naming your galleries you ensure that your visitors and search engines both have a clear understanding of what is on a given page. As you add copy and internal links, you’re also providing easy navigation to help people find the exact shots they’re looking for.
Bonus tip - do not erase your EXIF data. Google and other search engines can use this information to determine where a photo was taken and to verify the photo is actually of the area you claim it is in the title, name, and description. When uploading to SmugMug, we keep your EXIF data intact by default.
Step 3: Register in Google My Business.
Google My Business is a free service that helps Google understand what you do. You’ll want to create and verify your account and then make sure you fill out every field possible when registering for this service.
Make sure to define the area you serve (statewide? A few counties? Just in the city? Be specific!), list out the services you offer, and add hours of operation.
The more complete your answers are, and the more often you update your listings, the more chances you have for your business and your photography website to show up in local search results like “portrait photographer in Tulsa” or on a map as someone is looking for “holiday card photographers near me”.
For that second example, you can amplify your SEO by building a dedicated holiday cards page on your website, then updating your My Business listings with your new service, and even a discount if you’re a SmugMug Pro subscriber.
Step 4: Build backlinks.
Once you have content that defines your pages, your images are named and tagged, and your account on Google My Business is completed, you need to build what SEO experts call authority. This is how trustworthy or reputable your site is considered, and can be done through citations and backlinks.
A backlink is a link from an external website to your SmugMug website. It’s important to make sure these links are naturally occurring and come from a trustworthy website like your local news, trade publications, other businesses, or niche blogs.
Often, professionals looking to increase their SEO will collaborate with each other, trading blogs and features to drive traffic to each of their sites while building authority. This can also be done through PR outreach to local publications and news outlets when you have something big to announce!
For example, if you’re hosting a workshop on wedding photography, you could ask a wedding blogger to give you a shout out on their blog, reach out to venues and vendors you partner with and ask them to list you as a resource, and let the local news know about your event.
Just be sure you’re not spamming links to your website on forums, blogs, or irrelevant websites—these will get you penalized by search engines. If you look for natural fits for your photography, you’re likely to find lots of opportunities to connect.
------
These four easy steps will help you get found by search engines and customers alike, so get to it and good luck!
Photo Seller’s Foundations: Promotions, coupons, and discounts.
Photo Seller’s Foundations: Promotions, coupons, and discounts.
Welcome to day 2 of the Photo Seller’s Foundations series. If you missed part 1, be sure to check out yesterday’s products, pricelists, and packages post, or continue reading for today's deep dive into coupons, discounts, and limited-time offers. We’ll also walk you through how to make an automated “thank you” discount for your customers all year round.
As always, you can power through the whole series on our Photo Seller’s Foundations page, or get into the nitty-gritty of photography marketing and business strategy with our Marketing for Photographers ebook.
Setting up coupons in SmugMug.
First things first: Coupons and discounts are only available for SmugMug Pro subscribers. If you’re a Portfolio subscriber who’s been on the fence about upgrading, consider this one more reason to take the plunge and invest in your photography business.
Coupons are a powerful tool to grab attention, drive sales, and even prime return buyers for more purchases down the road. On SmugMug, coupons are generated via a code that your customers enter during checkout. The option to enter a coupon will only appear when coupon-eligible items are in your customers’ shopping carts.
You can manage coupons from the same place you find your pricelists: Just click “Manage” under the Coupon section of your Selling Tools page. Here you’ll see any previous coupon discounts you’ve run, and the option to create more.
More of a visual learner? Everything to get you started with coupons is also covered in our Pro Workflow webinar, Coupons: How and why?
Step 1: Choose your coupon type.
When you click the “+ Create Coupon” button in your coupon manager, you’ll be prompted to choose an initial coupon type. SmugMug coupons come in four different flavors:
- Amount Off: Choose a set amount to take off a purchase, before or after shipping is calculated.
- Percentage Off: Choose a set percentage to take off a purchase, before or after shipping.
- Free Shipping: Free standard shipping for your customer, or free airmail shipping if the order is international. If the customer opts for faster shipping at checkout, then an amount equal to standard shipping will be taken off the shipping total.
- At Cost: Offer your lucky customers the option to purchase photos at the same cost you’d pay to print them.
Once you’ve chosen a coupon type, you can fill in the details, including a title, description, desired currency, and discount amount. We recommend giving your coupon a descriptive title that will help you quickly identify it in your coupon list, like “Amount off portraits” or “Percent off metal prints.”
Last but not least, you can choose your custom coupon code. Have fun with this part! Choose something eye-catching, memorable, and descriptive to grab the attention of customers browsing their inbox or social feeds.
Step 2: Customize with restrictions.
Choosing your discount type is a great start, but the real power of coupons comes alive when you start applying restrictions to fine-tune your offer. These can be mixed and matched to build the perfect coupon for your customers.
When you click the “restrictions” tab, this is what you’ll see:
Valid from and Valid through will let you set the start and end dates of your promotion, if you
choose. Many promotions benefit from a limited duration, but some (like the one we’ll walk through making below) are good to leave open-ended.
Here are your other restriction options:
- Minimum Purchase: Set a minimum total price for the entire purchase before your coupon can be applied to a customer’s order. This can help you ensure the order amount is large enough to cover your coupon’s discount.
- Maximum Discount: The most you want a customer to receive off an order’s total. Especially helpful to ensure a large discount doesn’t eat too much into your gross profits.
- Maximum Uses: How many times a coupon can be used on separate orders. If this is left blank, your coupon will be good until it expires.
- Maximum Items: How many items the coupon can be applied to in a single order. The most expensive items will automatically be selected for the coupon application to give the buyer the largest discount.
- Choose galleries: By default, your coupon will apply to all your photos, but here you can choose specific galleries you want it applied to instead. This is an easy way to make client- or genre-specific offers.
- Choose products: Like galleries, your coupons will apply to all your products by default, but if you have some special items on sale (like ornaments) or you have a higher profit-margin product you’d like to promote (like gift cards), this tool will let you limit a coupon to a specific product or product category.
Pro tip: By combining coupon types and restrictions, you can create engaging sales like limited-time offers, bulk discounts, and buy-one-get-one deals. We have five great options broken down step by step here: Want to sell your photography? Use coupons. Any one of these would make a great promotion for that best-selling gallery you made yesterday, too.
Step 3: Get your promotions out there.
We’ll cover search-engine optimization (SEO), email, social media, and more in tomorrow’s post, but specific to coupons, here’s an easy way to get your discounts into the hands of people who’ll use them.
Ongoing discounts: Who says coupons are just for selling season? Promote return sales all year round with an automated 10% off “Thank you” coupon for all print orders. It’s an extra $1 per order, but you can deliver your coupon via a custom print, sticker, or, in some cases, both (visit our Help Center article for full details).
Here’s how to get it set up:
- Create a coupon for your thank-you promotion:
- In the coupon manager, click “Create” and select “Percentage off.”
- Title your coupon something descriptive, like “Thank you 10% off.”
- Enter a coupon code—for this example we’ll use “THANKS10.”
- Enter 10 in the “Discount Amount” field.
- Click “Create” and you’re done with the coupon.
- Enable “Thank You Prints”:
- Download these customizable PSDs and make them your own! Just be sure to keep the sizing the same—prints need an exact 3:2 ratio, and stickers need to be 2:1.
- Go to your Account Settings page, click the Business tab, and find the Printing section.
- Click “Manage” under the Order Branding subhead to open the Pro Branding tool.
- Upload your images for your coupon and sticker.
- Check the box next to Thank You Print and Sticker, then click “Done.”
And that’s it! You’ve just made an ongoing coupon to encourage your customers to buy again—or encourage their friends to buy by sharing the discount. It’s a great way to keep in touch with your customers, help them feel seen and valued, and drive repeat sales in the future.
Next up, it’s all about outreach and how to connect with your customers: SEO, email, social media, website updates, and more. Don’t miss it.
----------
Still confused about coupons? Reach out to one of our sales specialists for help.


