A place for you to learn, get inspired, and keep up to date with all things SmugMug and photography


You made it! After learning about products and pricelists, coupons and discounts, and connecting with customers, you’re ready to put it all together into a marketing strategy that will help you drive more sales for the holiday season and all year round.
Today’s post is all about managing the moving parts of your promotion ahead of time. Think of it as planning now, so your future self can relax and rake in the sales.
(If you really want to get ahead, we recommend reading through the Marketing for Photographers ebook as well. We can’t offer extra credit, but hopefully you get some extra cash!)
Here’s a quick checklist of the activities you can do (or might have already done) to prepare for your sales push:
1. Choose your products.
2. Pro option: Build a promotion to excite your customers.
3. Lay the groundwork for outreach.
You’ve done a lot of work to get here, and you’re almost ready for showtime. All this potential needs a plan, though. It’s time for a content calendar.
A content calendar gives you a bird’s-eye view of all the ways you can interact with your customers over time. It shows your communication channels (like your website, email list, and social media outlets) on one axis, and the date on the other, letting you plan and visualize where and when you want particular messages to connect with your future customers.
Content calendars are especially useful for creative businesses who need to spread the word about their work. Why? Because they’re efficient: You can create a single asset—like a blog post, a video, or a gallery—and build a whole raft of communications to promote it across your channels, where you’ll catch the attention of different audiences on each channel.
This means more eyes on your photos, more traffic to your site, and more chances to make the sale.
Picture this: you make a gallery of your best-selling photos for the holidays (we told you it’d come in handy).
Then you make a coupon for those photos.
You promote that gallery and discount with a simple shout-out to your email list.
Then you tweet about it on Twitter/X one day. Post a teaser image on Instagram the next. Poll your followers for their favorite photo on Facebook.
Maybe you throw one last reminder to your email list as the promotion is about to expire.
And all of a sudden, presto, you’ve got a marketing campaign.
Follow this approach for other galleries, new products, or upcoming holiday promotions, and you can start to see how a content calendar will help you keep everything organized on your end, and keep your customers coming back for more.
Building a content calendar is easy. You can start with something as simple as a spreadsheet— in fact, most fancy content calendar tools are based on just that.
To make things even easier, we built you a template you can use to get started for the upcoming selling season. Just click the image below to download the file, then open it in your favorite spreadsheet app.
Some businesses use content calendars to plan a full year in advance. Others may only use them for specific campaigns or particularly complex projects. For our purposes, a few months will do nicely.
With the “calendar” part taken care of, let’s look at content. For each channel, it’s important to consider what kind of content you want to put out there, and how to play to the strengths of each. For example:
Feel free to add any communication channels you like to the document (Pinterest? TikTok? Go wild), and let’s dig into scheduling.
Scheduling is the most personal part of your content calendar creation process, and it will be wholly unique to you and the type of campaigns you want to run. To get you started, though, here are a few important dates to keep in mind this season:
Upcoming holidays are called out in the content-calendar template, and we’ve gone ahead and populated the first week with a sampling of emails, posts, and assets to get you started. You’ll also want to keep an eye on shipping deadlines so you can let your customers know to order in time for the holidays!
Just like emails, you can draft and schedule your social media posts ahead of time using tools like Facebook’s native scheduler, or try an all-encompassing tool like HootSuite.
Whichever tools you use, a little up-front planning can make your selling season a breeze, so get out there and get posting.
Thank you for joining our Photo Seller’s Foundations series. We hope these tools are helpful for you this selling season, and, as always, our sales specialists are here to answer any lingering questions you have. We can’t wait to see your photos out in the world.
Welcome back to the Photo Seller’s Foundations series. If you missed our posts on products and pricelists or coupons and discounts, you may want to start there. Go ahead, we’ll be here when you come back.
(You can also tackle the series at your own pace on our Photo Seller’s Foundations page, or get a wealth of photography marketing and business strategy knowledge with our free Marketing for Photographers ebook.)
If you’re following along, you should have an established pricelist, a best-selling gallery, and a shiny new coupon ready for your customers. Now it’s time to get in touch. Today’s a big one: we’ll be going over the basics of email marketing and search engine optimization (SEO), and we’ll take you step by step through how to post a promotional banner to your website.
Ready? Let’s get to it.
Connecting with customers—new or returning—can be the hardest part of selling your photos. But there are a few simple ways to stay in touch with your existing customers, and attract new ones, with minimal time investment.
The most important part of this process is making content that people want to see. We’re willing to bet you’re already doing that with your photography, so let’s dig into the next step: leveraging those gorgeous photos to connect with more people.
When you upload new photos to your SmugMug galleries or add new products to your pricelists, do you tell anyone? If so, great! You’re ahead of the game. But if you’re like lots of photographers, it’s upload, add a title and tags (maybe), and move on to the next task at hand.
All those beautiful photos can help you strengthen and expand your customer relationships. You’ve just gotta get them out there. We recommend starting simple, with email and social media.
Getting started with email marketing takes a little work up-front, but it’s easily the best way to keep in touch with your customers. The most important component is a rich and varied list of people to email about your photography. Here’s how to build it.
If you’re just starting out your sales journey, connect with family, friends, and coworkers to see who might be interested in hearing from you and seeing your latest photos. Then get their email addresses, and be sure you’ve got a contact form on your website so current and prospective customers can easily get in touch.
Not sure how to add your own contact form? Episode 69 of SmugMug Live! walks you through the process step by step. Watch it here.
If you’re an established seller, you’ve got a head start on building an email list thanks to your previous customers. You can export a summary of your sales history by navigating to Account Settings > Business > Selling > Sales History > Manage.
On the right side of this page, you’ll see the option to download a detailed .csv file of your entire sales history. Open this file in your favorite spreadsheet program, and you’ll see a column for the email addresses of every customer going back six years.
Copy this column into a word processor or email marketing manager and presto! You’ve got the beginnings of an email list.
Pro tip: Be sure to download your sales history regularly so you can keep your email list up to date with your latest customers. The detailed version is also useful for tracking what types of products are most popular in your pricelist, how your customers are responding to a promotion, and more.
How you manage your email list is entirely up to you. Some photographers maintain their own curated email lists for different types of personal outreach. Others use services like MailChimp or Constant Contact to automate email sends and gain visibility into open rates, click rates, and overall engagement.
We’ll cover content planning in tomorrow’s post, but whichever way you go, all that’s left is to send those emails! We recommend reaching out whenever you have something to announce: a new product added to your pricelists, photos from your latest shoot, workshops you’re offering, or discounts and offers like the one you made yesterday.
Here’s a sample email template to spread the word about your new promotion. Just download the PSD or HTML file; customize it with your personal photos, logo, and text; maybe throw in some of those best-selling product images from part 1; and you’re off to a great start.
One last thing: Email subject lines are an easy way to stand out in a crowded inbox, so don’t be afraid to get adventurous! Here are a few ideas to get you started:
Many of the same rules for email marketing apply to social media as well. Did you post a new photo gallery, add a new product, or start a new promotion? Let your followers know on your social feeds.
The huge variety of platforms and metrics can seem like a complex beast, but really, it’s all about consistency and exposure. Share your content often (we’ll get to this tomorrow), tag your posts with relevant hashtags for discoverability, talk to other like-minded users, and you’re well on your way.
If you’re just getting started, here’s a quick and easy project to help you get some exposure: connecting your SmugMug site to your social outlets.
To keep you going strong, here’s a sampling of standard-sized promotional images for your social posts that include your brand-new 10% off discount. Download them here.
Photography is a big investment for most customers. People are doing research, comparing prices, and looking for just the right photographer to shoot their wedding, sell them the perfect photo for their living room, or take timeless family portraits.
That means people are out there, every day, looking for your expertise, your art, your photography.
SEO is how you get found by those potential customers, and we have a wealth of information on how to optimize your SmugMug site, right here at your fingertips.
We recommend starting with our Four steps to improve your SEO on SmugMug article for a detailed breakdown of the essentials, and if you’re still hungry for more, our SEO for Photographers guide is available for download here.
While you’re making tweaks under the hood of your SmugMug site, there’s one more tool for reaching out that will help you connect with your customers: on-site promotions.
You’ve built an email list. You’ve posted to social media. You’ve SEOptimized your SmugMug site, and you’re getting lots of love from organic traffic. What’s a hustling photographer to do next?
How about giving those lucky visitors a pleasant surprise?
You’ve probably seen websites with promotional banners across the top of the homepage, or for specific categories of products, and you can build the same for your SmugMug site. Here’s how:
Want to follow along? Click here for a video walkthrough of adding a promotional banner to your site.
You can also make banners for specific areas of your site (like education or photoshoots) or for specific galleries (like a recent client) by following the steps above and choosing those sections, pages, or galleries instead of choosing “Entire site” when placing your text block.
Just imagine: a family friend receives your email about your new discount and decides to check out your SmugMug site. To their surprise, they’re greeted by an even better discount when checking out your galleries. Now all that’s left is for them to fall in love with a photo and bring it home with them—and receive a bonus 10% off their next purchase!
That’s just one of the ways the above tools can combine to drive more sales for you this season, and all year round. But to really bring it all together, you’ll have to check in tomorrow where we tackle the big picture.
--------
Not quite ready to reach out to customers? Reach out to our sales specialists instead with any questions. We’re here to help.

Welcome to day 2 of the Photo Seller’s Foundations series. If you missed part 1, be sure to check out yesterday’s products, pricelists, and packages post, or continue reading for today's deep dive into coupons, discounts, and limited-time offers. We’ll also walk you through how to make an automated “thank you” discount for your customers all year round.
As always, you can power through the whole series on our Photo Seller’s Foundations page, or get into the nitty-gritty of photography marketing and business strategy with our Marketing for Photographers ebook.
First things first: Coupons and discounts are only available for SmugMug Pro subscribers. If you’re a Portfolio subscriber who’s been on the fence about upgrading, consider this one more reason to take the plunge and invest in your photography business.
Coupons are a powerful tool to grab attention, drive sales, and even prime return buyers for more purchases down the road. On SmugMug, coupons are generated via a code that your customers enter during checkout. The option to enter a coupon will only appear when coupon-eligible items are in your customers’ shopping carts.
You can manage coupons from the same place you find your pricelists: Just click “Manage” under the Coupon section of your Selling Tools page. Here you’ll see any previous coupon discounts you’ve run, and the option to create more.
More of a visual learner? Everything to get you started with coupons is also covered in our Pro Workflow webinar, Coupons: How and why?
When you click the “+ Create Coupon” button in your coupon manager, you’ll be prompted to choose an initial coupon type. SmugMug coupons come in four different flavors:
Once you’ve chosen a coupon type, you can fill in the details, including a title, description, desired currency, and discount amount. We recommend giving your coupon a descriptive title that will help you quickly identify it in your coupon list, like “Amount off portraits” or “Percent off metal prints.”
Last but not least, you can choose your custom coupon code. Have fun with this part! Choose something eye-catching, memorable, and descriptive to grab the attention of customers browsing their inbox or social feeds.
Choosing your discount type is a great start, but the real power of coupons comes alive when you start applying restrictions to fine-tune your offer. These can be mixed and matched to build the perfect coupon for your customers.
When you click the “restrictions” tab, this is what you’ll see:
Valid from and Valid through will let you set the start and end dates of your promotion, if you
choose. Many promotions benefit from a limited duration, but some (like the one we’ll walk through making below) are good to leave open-ended.
Here are your other restriction options:
Pro tip: By combining coupon types and restrictions, you can create engaging sales like limited-time offers, bulk discounts, and buy-one-get-one deals. We have five great options broken down step by step here: Want to sell your photography? Use coupons. Any one of these would make a great promotion for that best-selling gallery you made yesterday, too.
We’ll cover search-engine optimization (SEO), email, social media, and more in tomorrow’s post, but specific to coupons, here’s an easy way to get your discounts into the hands of people who’ll use them.
Ongoing discounts: Who says coupons are just for selling season? Promote return sales all year round with an automated 10% off “Thank you” coupon for all print orders. It’s an extra $1 per order, but you can deliver your coupon via a custom print, sticker, or, in some cases, both (visit our Help Center article for full details).
Here’s how to get it set up:
And that’s it! You’ve just made an ongoing coupon to encourage your customers to buy again—or encourage their friends to buy by sharing the discount. It’s a great way to keep in touch with your customers, help them feel seen and valued, and drive repeat sales in the future.
Next up, it’s all about outreach and how to connect with your customers: SEO, email, social media, website updates, and more. Don’t miss it.
----------
Still confused about coupons? Reach out to one of our sales specialists for help.

Hello, and welcome to the Photo Seller’s Foundations series.
It’s simple, straightforward, and built to help you make more photo sales. Four articles, four tasks, and a handful of helpful tools will lay the groundwork for your best sales yet.
For the overachievers who’d like to get it all done at once, head over to our Photo Seller’s Foundations page for all the goodies.
For the academics who prefer a book to a blog series, check out our comprehensive Marketing for Photographers ebook, published in collaboration with leading photography educator Phlearn.
Lastly, for everyone who’s along with us for this ride, read on for part 1: Products, pricelists, and packages.
Pricelists are the key to selling photos on SmugMug. They let you manage all your print and download pricing in one place. Think of your pricelist like a template you can apply to any gallery or specific images you like: choose what products you’d like to sell, set your profit, and watch the sales roll in.
Portfolio and Pro subscribers can find the pricelists manager on the Selling Tools page in the navigation bar when logged into SmugMug. Click the “Manage” button under the Pricelists section and you’re in.

Note that SmugMug Portfolio accounts can only have one pricelist active at a time, while Pro accounts get the option to manage multiple active pricelists at once.
Prefer to learn by watching? Check out Episode 75 of SmugMug Live! for a start-to-finish walkthrough of pricelists, plus some helpful tips and tricks to get you started.
To prep for a sale, you’ll first want to check in on your pricelists and make sure your products and profits are set how you like them.
On the Manage Pricelists page, the white star indicates your default active pricelist. This pricelist is applied to all galleries where the shopping cart is turned ON, with the exception of Pro accounts running multiple pricelists. Click it, and you’ll be able to see more details, including your print lab, currency, preferences, and all the product categories you currently have for sale. Light-grey items can be purchased, dark-grey items can’t.

Around the holidays, our fantastic print partners introduce seasonal products like greeting cards and ornaments. If it’s been a while since you’ve updated your pricelists, there might also be new products we’ve added, like epic prints, that you’ll want to enable.
To add these items, click “edit list” in the bottom-right of the screen. On this page, you can enable greeting cards from the right-hand toolbar. By default, your base profit for greeting cards will be set at 30%, but you can change this manually.

Pro tip: Final pricing on items like greeting cards will change based on your customers’ choice of paper, design, and more. To check the final price of gift cards or other items for your customers, navigate to your SmugMug site in a logged-out or incognito tab in your browser, then add your desired items to your cart, where their final prices will be listed. If you check while you’re logged in, you’ll see *your* cost, not the cost-plus-markup your customers will see.
To add or remove other items from your pricelist, click “choose products” in the upper right of your Edit Pricelist screen. Here you’ll find a full list of possible products to choose from. Click each category to see specific sizes, and check/uncheck the boxes to select the products you’d like to sell this season.

If you’re not sure which products to choose, or want to know more about your various print options, take a walk in your customer’s shoes and browse through your (or another photographer’s) SmugMug site to get a better idea of what these various print products look like.
Want to see what your photos will look like as some of this season’s best sellers? Download these free PSDs of greeting cards, ornaments, and metal prints and drop your photos in to show your clients and customers.
Preparing for a sales push is a great time to revisit your profit margins and make sure everything is in order. There are three ways to set your profits on SmugMug.
Suggested pricing: The first (and easiest) way to set your profits is by selecting the “suggested pricing” option when you create a new pricelist. This will populate your pricelist with a data-driven variety of print products, plus markups for each one that will net you a fair sum no matter what you sell.

Default base profit: You can also customize a default base profit in the right-hand toolbar of the Edit Pricelist page. This will apply the same percentage profit to every item you sell — but be aware that a several-hundred-percent markup on paper prints that seems reasonable can produce a shocking price tag on larger, more expensive items. Be sure to review the price and profit for your products before applying and saving your pricelist.

Individually: Setting your profits individually gives you complete control over each and every product you offer. To set your profits individually, select your product category and item in the Edit Pricelist page, then enter your desired profit amount (e.g., $1 per small print) or your desired final price (e.g., $3 per small print). Whichever you choose, the other will be automatically calculated based on your preferences.

For SmugMug Pro subscribers, packages are an easy way to encourage bulk purchases, often at a discount.

From your Selling Tools page, click “Manage” under the Packages section to get started. If you have existing packages, click the one you’d like to edit. Otherwise, click “New Package” and you’ll be whisked to the package-creation page.

Here you can add items to your package, adjust options like color correction and single- or multiple-image packages (think school photos vs. wedding photos), and, of course, set your desired profit. We suggest choosing your print lab to match the print lab on your default active pricelist.
Pro tip: The most successful packages encourage customers to buy more photos for a sweet discount, so be sure to price your packages slightly lower than the cost of the packaged items sold individually.
At this time, packages are limited to physical products only, but you can use coupons to create digital-download “packages” with a few simple tricks. More on that tomorrow, when we dive into Photo Seller’s Foundations Part 2: Promotions, coupons, and discounts.
Do you have a few photos that outsell the rest? Or maybe you’re particularly proud of your latest photoshoot and would like to see it in the spotlight? Now is a great time to make a new gallery in your photo site. This will come in handy later on, so check out our step-by-step guide here: Create a gallery.
(Not sure about your sales numbers? We’ll cover downloading these details in part 3, but you can get a head start at our Help Center.)
----------
Still perplexed about pricelists and products? Reach out to one of our sales specialists for help.
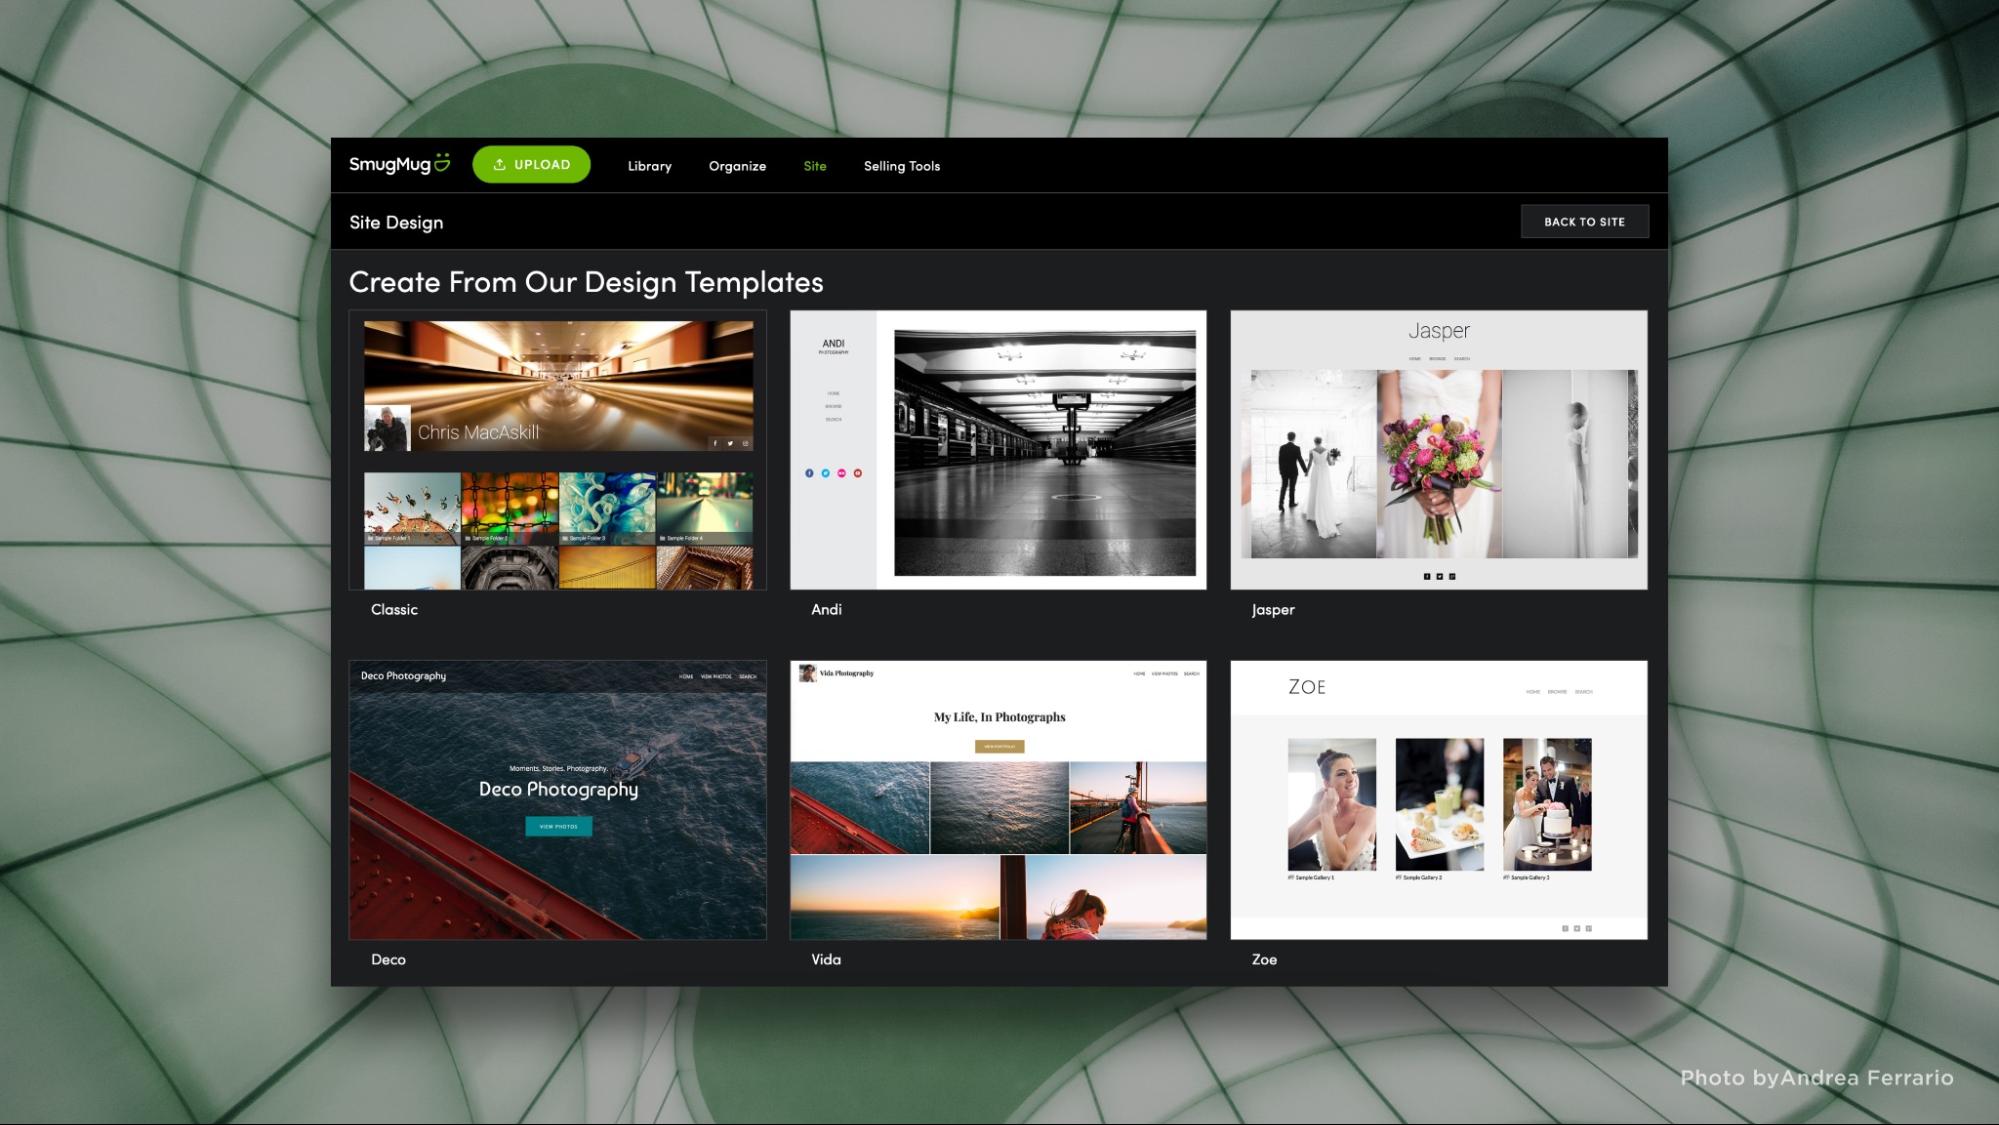
Short on time? We get it. That's why SmugMug gives you everything you need to publish your site quickly and easily. All you need to know how to do is click a mouse.
We offer several beautiful site designs for you to choose from, and you can always choose a different template later. Each one comes with an out-of-the-box, designer-approved layout, font choice, and color scheme. We’ve created a variety to fit many styles of photography, so scroll through and pick the one that speaks to you.
When you open a new SmugMug account, you'll want to add photos to it right away. There are many ways to upload your photos, from our built-in browser-based uploaders to our publish service for Lightroom users.
FYI: At this point your site is good to go. Simply hit the Show Me My Site button and your new website will be visible to the world! But if you want to make further changes, keep reading.
We make it easy to change the look and feel of elements that appear across all your site's pages. Some examples include adding a background image, including your name in the header, and changing text on your menu bar.
To open customization mode, click Customize Design at the top of your site.
Here are a few things you could tweak first:
Tip: Make sure you’re on the Entire Site customization mode; otherwise, your tweaks won’t show up across your site.
Your design will include various galleries and content on your homepage, but you can edit them (or add more!) by clicking Customize Design and making sure Homepage is selected.
Drag and drop, remove, or edit the individual content blocks that appear on this page. You'll know where they can go when you see a highlighted arrow and green line appear. Note that you can stack content blocks one atop the other, or line them up to create columns across the page.
Tip: The page elements are color coded, so you can edit any level content block from any page. For example, if you click the Customize Design button from within a gallery, you can still tweak sitewide things like the header and footer.
Once you're happy with the content blocks you've arranged, you can click Preview to see your changes without the customization menus covering the screen.
Love it? Hit Done. Your new site is now available for the world to see. Congratulations!
Your design will have the essentials already built in, but with a Power, Portfolio, or Pro account, you can add more pages to suit your style. For example, you can create an “About Me” page with your photo and bio, a “Services” page, etc. Simply click the Organize button at the top of your homepage. Once inside the Organizer menu, choose Create > Web Page and name it.
Next you’ll see your brand-new page. From here, you can customize and add in any content blocks in virtually any configuration you want. When you're happy with it, publish your changes.
If you’d like to make your new page easier to find, open customization mode and mouse over your menu bar. Click to edit it and add a new link, then find the link to your new page within the Pages I Choose picker menu.
Tip: You can drag to rearrange the different links in your preferred order.
And with that, you’re done!

As your photo library grows and grows, so does the challenge of keeping track of your memories or your clients' shoots. It's crucial to keep your site neat, and it's exceptionally easy to manage all your folders and galleries with the powerful Organizer tool.
But beyond that, the content you display on your pages is the most important part of your viewers' experience. Think about what a guest or a potential client is looking for when they see your website for the first time. Will they find what they need or will they give up and move on?
How do you go about guiding them to the right stuff?
There are several really great ways to guide visitors that arrive on your homepage to the content that you want them to see most. We've gathered a few of the best examples from SmugMug photographers.
Choose exactly what to display on your homepage using our drag-and-drop content blocks. You can add any of the following:
These can be used as a “call to action” to move a visitor from your homepage and into a specific selection of pages on your site.
Here are a couple of elegant examples of content blocks on the homepage:
Take advantage of the keywords you've added to your photos to help visitors find the right stuff. You'll find the keyword cloud content block among the discovery choices in the customize content block panel.
A well-constructed menu bar allows you to bring attention to the galleries you want to be seen first, and to link to other places around your site: your portfolio, your “About Me” page, your pricing, your contact information, and so on.
The SmugMug default navigation menu includes links to Home, Browse, and Search, but we recommend you add more so your guests don't have to slog through all your galleries to find examples of your work.
Look here to see how to add new links to your menu bar.
Why choose? The best (and clearest!) way to guide your guests is to use both a well-curated homepage and a well-manicured menu bar.
Here's what we suggest:
Getting your visitors and potential clients quickly to your best and most relevant content is an ideal way to increase engagement and potentially land that new sale. Have any other tips that you’ve found helpful? Share them with us.

A happy customer is a return customer. Your clients chose you over others because they knew you could meet their specific needs, but your job is much more than creating a few good photos: you need to deliver a quality experience from first contact to getting those prints into their hands.
All websites have some basic, common elements: a landing page, header, footer, content boxes, and a way to navigate from page to page. You can change all these elements using customization on your SmugMug Power, Portfolio, and Pro sites.
In addition to the above, you should include the following:
You can also spice your website up with
Make use of your built-in SmugMug profile. Add your name or business name, an image of yourself, and a background image to take full advantage. You want this info to be easy to find, either on your homepage or in an “About Me” page.
All SmugMug accounts also get a contact email address to fill in on their profile. That, in turn, creates a contact request form available from the contact link in the footer or in your navigation menu.
While galleries are the building blocks of your site, they can be categorized into higher-level folders up to seven levels deep. Keep your site organized to make things easier on your visitors. Then build a navigation menu to help them get around your site.
A navigation menu is a row of links at the top or side of every page, best used when you link to specific galleries, pages, or folders on your site. For extra assistance navigating your site, consider adding breadcrumbs. These additional links at the top of each gallery easily take your viewers back to a gallery’s category or to your homepage. Nothing's worse than a digital dead-end.
Limit choices and don’t overwhelm the viewer. Cull your shoot down to the best of the best. Limit the products that you sell as well—price only those that best suit your photos' and your clients' needs.
Then organize your photos to provide a great customer experience in a meaningful and easy-to-navigate way. Your viewer will have an easier time browsing their wedding photos if you take the time to organize them into galleries rather than showing them one gallery with all 1,200 photos.
SmugMug smart galleries can be a real timesaver. Create your galleries and define rules based on keywords, then upload all your photos into a single Unlisted gallery. The smart gallery settings will automatically pull in photos that match your rules based on your keywords.
Take this one step further by making use of events and favorites so customers can pick and choose their favorite photos. Favorites are put into a separate gallery that both you and your customer can see, providing a great way to discuss their choices.
Giving clients incentive to buy sooner than later can make all the difference. Try these tips:
Creating an easy and user-friendly site will encourage customers to linger on your site: clear, organized navigation, easy-to-find galleries, and a simple list of products they can buy are all incredibly helpful. Try these tips to keep your bounce rate down and your sale rate up.

Need to make a custom page with text and photo features? On SmugMug, it's as easy as drag, drop, and go. Here's how to build a custom page in three easy steps.
First, create the page you want. If you want to create an About Me page, for example, start by hitting the Organize link in your site header, then click Create > Web Page.
Give it a name, keywords, settings, and any other information you’d like to add. Hit the Done button at the top of your browser window to save.
Tip: Your new page will appear at the bottom of your folder tree list when you open your site Organizer. You can drag it to any other place (like into a folder) if you want to move it.
Next, find the page you just made. You can do this by typing in the URL for it, or you can click the link from the preview window in your site Organizer.
Once you're at your new page, open up customization by clicking Customize Design at the top of your page. To make sure you'll be applying changes to only the new page (and not your whole site), look for the following folder list at the top right.
Browse through the different content boxes available in the Content tab and drag the ones you like wherever you want onto your page.
Tip: A light green line will appear in any spot that can accept a block. If you miss, we'll show you a dotted outline mapping out where valid areas lie on the page. Experiment and have fun!
You always get an instant, live preview of changes as you’re making them, but to clear the windows, click the Preview button and then Done when you're finished.
Copy the URL for your new page from the top of your browser, then in the Customizer, click to highlight the top-level, Entire Site option from the top right.
If the site design you've chosen comes with a menu bar, click the little wrench to open the edit box.
Tip: If your design doesn't include a menu bar, you can add one by dragging and dropping the Menu content block from the Content > Navigation section.
Click the "+" sign to add a link to the menu. Fill in the copy you want and paste in the URL for the new page you created. Click Done.
That's it! Your new page is ready to be seen.

If you’re a portrait or event photographer, you’ve undoubtedly had clients ask you any or all of the following questions:
The fact is we're living in a digital world. Fewer and fewer people are interested in physical prints and are increasingly using websites and social media to store and share their precious memories.
At SmugMug, we still believe in the power of a printed photograph, but we think it's equally important to adapt your business to the digital needs of today’s customers.
You've already got your portfolio and proofing solution sorted out with SmugMug, and you know what a lifesaver our print labs are in fulfilling your print and merchandise orders. Don't leave money on the table by keeping digital downloads a secret!
Portfolio and Pro account owners can price and sell single digital images and video files to clients and they're retrievable immediately after checkout. In other words, they're perfect for customers who are itching to share with friends and family right away. Digital downloads also buy you time, especially if they'll be waiting for you to proof your prints; and they provide a little extra cash in your pocket.
Don't think you can emotionally "let go" of your digital files? Not to worry: You can lock them down and offer only smaller display sizes or choose to offer files that only include your printmark. Additionally, you can set one price for personal use and charge more for commercial licensing. Or sell the whole gallery at a single package price.
1. Protect against theft.
When you decide to start selling downloads, it's of utmost importance to be sure you've got image protection set up the right way. Take a look at the resources we've written to help you set up watermarking, right-click protection, and more.
2. Strategize your pricing.
We've got a great article that helps you answer the eternal question, "How much should I charge?" but this is a very personal decision and there is no right answer. We can, however, offer some practical tips:
3. Set your prices.
Just like traditional prints and gifts, you price your photo, video, and gallery downloads in your pricelists manager to make them available to your clients. The only difference is that all digital downloads are delivered instantly via email from SmugMug, and they aren't tied to a specific print lab like physical products.
We hope we've inspired you to try an all-new way to make more money from your photography, as well as given you new ways to make your clients happier. If you're brand new to digital downloads or just want to read more about how you can make money at SmugMug, read our help pages for all the details.
As always, don't hesitate to reach out to our Support Heroes if you're confused, need help, or just have a question about what you need to do next. Happy sales to you!


